- Section the hair in half
- Tie the top half into a ponytail and clip it out of the way
- Taking fairly large sections from the bottom half of the hair, use the frizzing ‘figure of 8’ technique
- Leave this in to set
- Transform the ponytail into a bun, which is quite high up on the head, but you must ensure that you leave 2 strands of hair at the back/bottom out of the bun, which you are going to plait
- Plait these 2 strands of hair, and wrap one round either side of the bun
- Grip these into place, ensuring that there is a clear plait that runs all the way around the bun
- Release the frizzing technique but DO NOT comb out
- Add the pearl pins into the bun
Sunday, 30 November 2014
Assessment - My Final step-by-step Instructions For My Design
Assessment - My Partner Practicing My Design


The only real problem that we had to overcome was explaining how the plait fitted into the design, and where to get the hair from, but once I explained and helped show her visually, she understood. (You are not actually able to see the plait from the angle of the pictures, but it is there!) The stylist also realised, when carrying out the design, that she needed the plait to be slightly bigger in order to be more noticeable, so for next time, she has noted to leave a larger section of hair out which is going to be plaited. The only other constructive criticism I had was that she could perhaps try pushing the pins (with the pearls on) in slightly further, to try to hide the pin section, so that it was the just the pearls on show.
Otherwise, I was very happy with the overall look and it is what I pictured. The bun is a good size and in the correct place, the pearls are positioned perfectly, and the frizzing technique was carried out effectively - the stylist took the right amount of hair, so that the waves did not come out too tight and shrivel the length of the hair up.
Timed Assessment - Pictures And Evaluation (In the role of the Hair Stylist)


Although, there would have been a few improvements that I would of liked to have made... For example, at the back, you are able to quite clearly see the grips that are holding the bouffant up, so I could've perhaps tried to cover these up slightly by moving the bow higher up, or by using strands of hair to cover the grips. Also, on one of the side images, you can see a tiny loop of hair where it does not exactly fit into the bow shape, so ideally I would've liked to have moved this so it was hidden. However, during the assessment, it was actually very difficult to get all of the hair in the bow to fit the shape, due to hair having different lengths and layers; this meant that some of the hair was not long enough to be wrapped in the bow shape, and thus did not reach into the pins, but I tried my best to fit all of the hair into place.
I believe everything else was done quite successfully, and it was the best I had executed the look - the padding was the highest that I had been able to achieve so far, and I managed to ensure it was totally covered and not noticeable, the sides were slicked back as desired, and the ringlets/curls were all completed to a good standard. Furthermore, I was able to carry out the design in a good amount of time and have it finished to a high standard within the time limit.
Friday, 21 November 2014
Assessment - My Final Design

I have chosen a half up, half down look because I believe this is quite contemporary and is often used today, as well as the bun I have decided to incorporate, and have higher up on the head (again, which is quite modern). Having it higher up, actually makes it almost seem like a crown or head accessory like the Elizabethans would have worn. In the bun, I have decided to also incorporate quite big statement pearls - the pearls are Elizabethan, but the fact they are quite big and they make a statement relates to modern society because accessories are often used to make a statement nowadays.
Going around either side of the bun will be a small plait - this is an Elizabethan influence, and where the hair has actually been taken from below the bun, it creates a heart-shape, which is, again, related to the Elizabethans.
Finally, I have decided to have very defined curls, which will be created by using the frizzing 'figure of 8' technique (made with slightly longer grips, so that the curl is not too tight), but it will not be brushed out. I feel this is a mixture between modern and Elizabethan, because curls are still used in today's society, but yet these type of curls are very similar to the tendrils that Elizabethans would wear.
Thursday, 20 November 2014
Assessment - My Final Step-by-step Instructions For My Partners Design
- Section the hair, from the ‘corners’ of the head, so that you can crimp the correct parts of the hair. Tie the rest of the hair out of the way
- Crimp the top section of hair (using small sections at a time)
- Section off a very small section across the hair line (that you’ve just crimped) and use the frizzing technique to add even more volume and thickness
- French plait the section where the padding is going to be and grip into place
- Backcomb the front section of the crimped hair quite dramatically
- Remove the grips from the frizzing technique and brush this out
- Insert the padding - place any remaining crimped hair, from underneath the plait, over the padding, and then pulled the hair from the front over the padding and gripped this into place
- Take the remaining uncrimped hair out of the hair band and section this at the top of the ears
- Reposition the pony tail so that you have half of the remaining hair down
- Use the hair in the pony tail to create a bow - take 1/3 of the hair and roll it around your fingers, and then grip it into place. Then repeat this on the other side, and leave the final third to represent the ribbon that hangs at the bottom
- Insert the pearl into the centre of the bow
- Use curlers, with a very small barrel, to create very tight ringlets in the rest of the remaining hair
- A paddle brush
- A sectioning comb
- Grips
- Pins
- A hair band
- A pearl accessory
- Crimpers
- Curlers
- Hairspray
- Heat protection spray (optional)
Assessment - Further Practicing Of My Partners Design


Today's practice has allowed me to improve and finalise my partners requirements, as well as my techniques. I now feel quite confident with creating the design, as long as I am able to crimp the hair before hand.
I repeated exactly the same process as before (as shown in a previous post), and the only difference was that my partner has decided to incorporate a pearl into the centre of the bow. This pearl is attached to a metal spiral that I must just twist and screw into the hair, so it is fairly straight-forward.
The only other thing that turned out differently was the height of the quiff/bouffant - my partner actually asked if it was possible to make it any higher, so I did try adding a larger padding, but the model's hair was not actually long enough to reach over it without the padding showing through. However, I was able to make the quiff higher than the last time I practiced, by adding even more backcombing.
Overall, the designer was satisfied with the height and the overall look of the design, as was I. I am looking forward to the final assessment and I feel I am now prepared, and I just hope that everything goes to plan!
Wednesday, 19 November 2014
Alexia Sinclair - The Regal Twelve
Alexia Sinclair’s The Regal Twelve is a series that combines hundreds of photographic elements and illustrations to form complex digitally montaged artworks. The series portrays twelve European monarchs who have ruled supreme and whose lives span over two millennia. Through the study of history and portraiture, a series of contrasting regals formed, whose stories are revealed within each artwork.
An unusual blend of Royalty, this series features very few conventional rulers. Instead, The Regal Twelve is a diverse series that celebrates the famous, the infamous and the obscure. Selection was based on their contrasts in leadership, their flamboyancies and their enduring influence upon society. In a time when women generally held little power, these Artemis-like women ruled as both male and female.

Alexia explains: Elizabeth - "The Virgin Queen" uses the game of chess to parallel Elizabeth's life, as her own survival as a monarch relied on the skilful manoeuvring of political forces. Elizabeth sits as a pawn, holding the orb and sceptre. These, along with the rings that cover her fingers are from the royal jewel collection and have been added post-production.Elizabeth's hair is pure illustration and is embellished with pearls. Used as an extension of her crown, Elizabeth's hair is also inspired by fifteenth century Italian ideals of beauty, where fantasy within the hair of a portrait symbolised goddess stature. The pearls are not limited to the hair though as they also cover the queen's ruff, dress and eyelids. The radiating halo is the ultimate symbol of Elizabeth's embodiment of the Virgin.
Reference: https://alexiasinclair.com/collections/the-regal-twelve#elizabeth-i
I find this image extremely powerful and intriguing, and that is without even reading Alexia's explanation and concept of the image! The physical arrangement of the image is very well done, and the props used simply add to the image. Everything about the image screams Elizabethan but yet it still has a contemporary feel to it.
The thing that stands out to me is the hair - the vibrant red contrasts with the dark background and fairly neutral colours used throughout the rest of the image. The hair, to me, looks extremely complicated, and I find it mind-boggoling to look and think about how they have created the amount of volume they have, but in such a sleek and effective way. I like how the hair actually goes out to the side, and all of the pearls, the crown and other accessories hidden amongst the hair are positioned perfectly, with them not be too overwhelming, but at the same time, there is more than enough.
Furthermore, I like how the hair almost comes across like it is the sun and it is beaming and giving off rays of light, that are the same vibrant colour of the hair. This instantly draws and directs your attention to the hair.
This image is definitely Elizabethan, if not New Elizabethan and it certainly is very eye-capturing. The element of the image that I feel relates to my own design, is the use of the pearls which are stuck in amongst the hair - my design actually features a similar idea because I am having quite large pearls pushed into the bun in my design also.
Elizabethan Fashion On The Catwalk (Alexander McQueen)

"Sarah Burton’s latest creations for Alexander McQueen arrive amid the announcement of a new Pope. Fit for the occasion, the label's Fall 2013 ready-to-wear collection ushers in the likes of Communion dresses, cardinal robes, and high fashion favored during the reign of Queen Elizabeth I. Although only a true aristocrat of fashion might be able to pull off one of Burton's gilded headpieces, these stunning looks sure do make one appreciate the talents of a luxury designer. The ready-to-wear collection revolves around 10 black and white looks evoking Elizabethan fashion with tight waists and flared hip lines amidst wide sleeves and billowing skirts. The fabrics used display exquisite detailing, like the delicate lace that cascades over a roomy petticoat. An elaborately folded neck ruffle completes the look of this doll-like Communion dress."
Reference: http://www.justluxe.com/fine-living/fashion/feature-1891473.php

I think that these designs have a very direct influence from the Elizabethan era - especially the hair and hair accessories. The accessory reminds me very much of a caul, which was often worn by Elizabethans. In this modern twist, it appears that it has been brought forward and expanded to cover the whole face and head, and it has been made much more glamorous, with added hints of sparkle. However, they do actually feature a lot of pearls, which once again, relates back to the Elizabethan style. I think the piece works extremely effectively and definitely makes a statement, whilst bringing a new Elizabethan feel to today's modern society.
 |
| Elizabethan caul |

Assessment - Practicing My Partners Design
Today, my partner introduced and explained her hair design to me. She wanted a very big bouffant (made up of crimping, frizzing and padding), along with a bow at the back of her head, and finally some ringlets with the remaining section of the hair.
However, this was not actually her initial idea - originally she wanted very tight french plaits at either side of her hair so that the bouffant at the front stood out and the sides were flat, but as we created the design, she actually decided that she preferred the hair just sleeked back and that we would use gel.hairspray to ensure the hair was totally pulled back and neat.
At first, I was quite overwhelmed by the design and I thought that I would find the design quite difficult as well as hard to complete within the time limit. However, as I actually got stuck in and attempted the design, the easier it got. Luckily, I have agreed with my teacher that I am able to prep the hair beforehand (e.g. crimping) in order to complete the design to a good standard.
The first thing I did was section the hair, so that I was able to crimp the correct parts of the hair. I tied the rest of the hair out of the way.

I then crimped the top section of hair (using small sections at a time).

I divided off a very small section across the hair line, and used the frizzing technique on this hair to add even more volume and thickness.

I backcombed the front section of the crimped hair quite dramatically. I then removed the grips from the frizzing technique, once the hair had set, and brushed this out.

I french plaited the section of hair where the padding was going to go (just behind the section of hair that I had backcombed) and gripped this into place.


I took the remaining uncrimped hair out of the hair band and sectioned this at the top of the ears. I repositioned the pony tail and the hair from the top section into the hair band, leaving half of the hair down.

I used the hair in the pony tail to create a bow. I did this by taking 1/3 of the hair and rolling it around my fingers, and then gripping it into place (very similar to when you create a bun), I then repeated this on the other side, and left the final third to represent the ribbon that hangs at the bottom. I thought this actually worked quite well and I was able to get my head around it quite quickly.

Finally, I used curlers with a very small barrel to create very tight ringlets, as the designer required.


Overall, I was quite satisfied with how the look turned out because I think it works well and looks effective, and I think I was able to follow my partners design very closely.
The only thing I would change, is that I would use a slightly smaller padding next time, because some of the hair had to be stretched in order to reach all the way over and cover the padding; this meant that the hair lost some of its height and volume.
I think with being allowed preparation, I will be able to complete the design on time and to a good standard. I am looking forward to practicing again and perfecting the look and my techniques.
However, this was not actually her initial idea - originally she wanted very tight french plaits at either side of her hair so that the bouffant at the front stood out and the sides were flat, but as we created the design, she actually decided that she preferred the hair just sleeked back and that we would use gel.hairspray to ensure the hair was totally pulled back and neat.
At first, I was quite overwhelmed by the design and I thought that I would find the design quite difficult as well as hard to complete within the time limit. However, as I actually got stuck in and attempted the design, the easier it got. Luckily, I have agreed with my teacher that I am able to prep the hair beforehand (e.g. crimping) in order to complete the design to a good standard.
The first thing I did was section the hair, so that I was able to crimp the correct parts of the hair. I tied the rest of the hair out of the way.
I then crimped the top section of hair (using small sections at a time).
I divided off a very small section across the hair line, and used the frizzing technique on this hair to add even more volume and thickness.
I backcombed the front section of the crimped hair quite dramatically. I then removed the grips from the frizzing technique, once the hair had set, and brushed this out.
I french plaited the section of hair where the padding was going to go (just behind the section of hair that I had backcombed) and gripped this into place.
I then inserted the padding. I placed any remaining crimped hair, from underneath the plait, over the padding, and then pulled the hair from the front over the padding and gripped this into place.
I took the remaining uncrimped hair out of the hair band and sectioned this at the top of the ears. I repositioned the pony tail and the hair from the top section into the hair band, leaving half of the hair down.
I used the hair in the pony tail to create a bow. I did this by taking 1/3 of the hair and rolling it around my fingers, and then gripping it into place (very similar to when you create a bun), I then repeated this on the other side, and left the final third to represent the ribbon that hangs at the bottom. I thought this actually worked quite well and I was able to get my head around it quite quickly.
Finally, I used curlers with a very small barrel to create very tight ringlets, as the designer required.
Overall, I was quite satisfied with how the look turned out because I think it works well and looks effective, and I think I was able to follow my partners design very closely.
The only thing I would change, is that I would use a slightly smaller padding next time, because some of the hair had to be stretched in order to reach all the way over and cover the padding; this meant that the hair lost some of its height and volume.
I think with being allowed preparation, I will be able to complete the design on time and to a good standard. I am looking forward to practicing again and perfecting the look and my techniques.
Monday, 17 November 2014
Elizabethan Portrait Vs. Contemporary Elizabethan Portrait

The main thing I like in the portrait (as I have mentioned in a previous post) is the tendrils. I like how defined they are and the general shape that the hair is able to create. It is also very interesting to look at the hair/head accessory that she is wearing because it is very elaborate and features many different pearls and jewels and detail.

I have chosen this hairstyle as a contemporary Elizabethan style. I feel the colour and curls still relate to the Elizabethan era, but it has a lot of modern twists. For example, the hair is actually ombre, which has become very popular recently. Also, the use of a half-up, half-down look is quite contemporary but the length and type of curls used makes it look much more contemporary.

Thursday, 13 November 2014
Problem Solving My Final Design
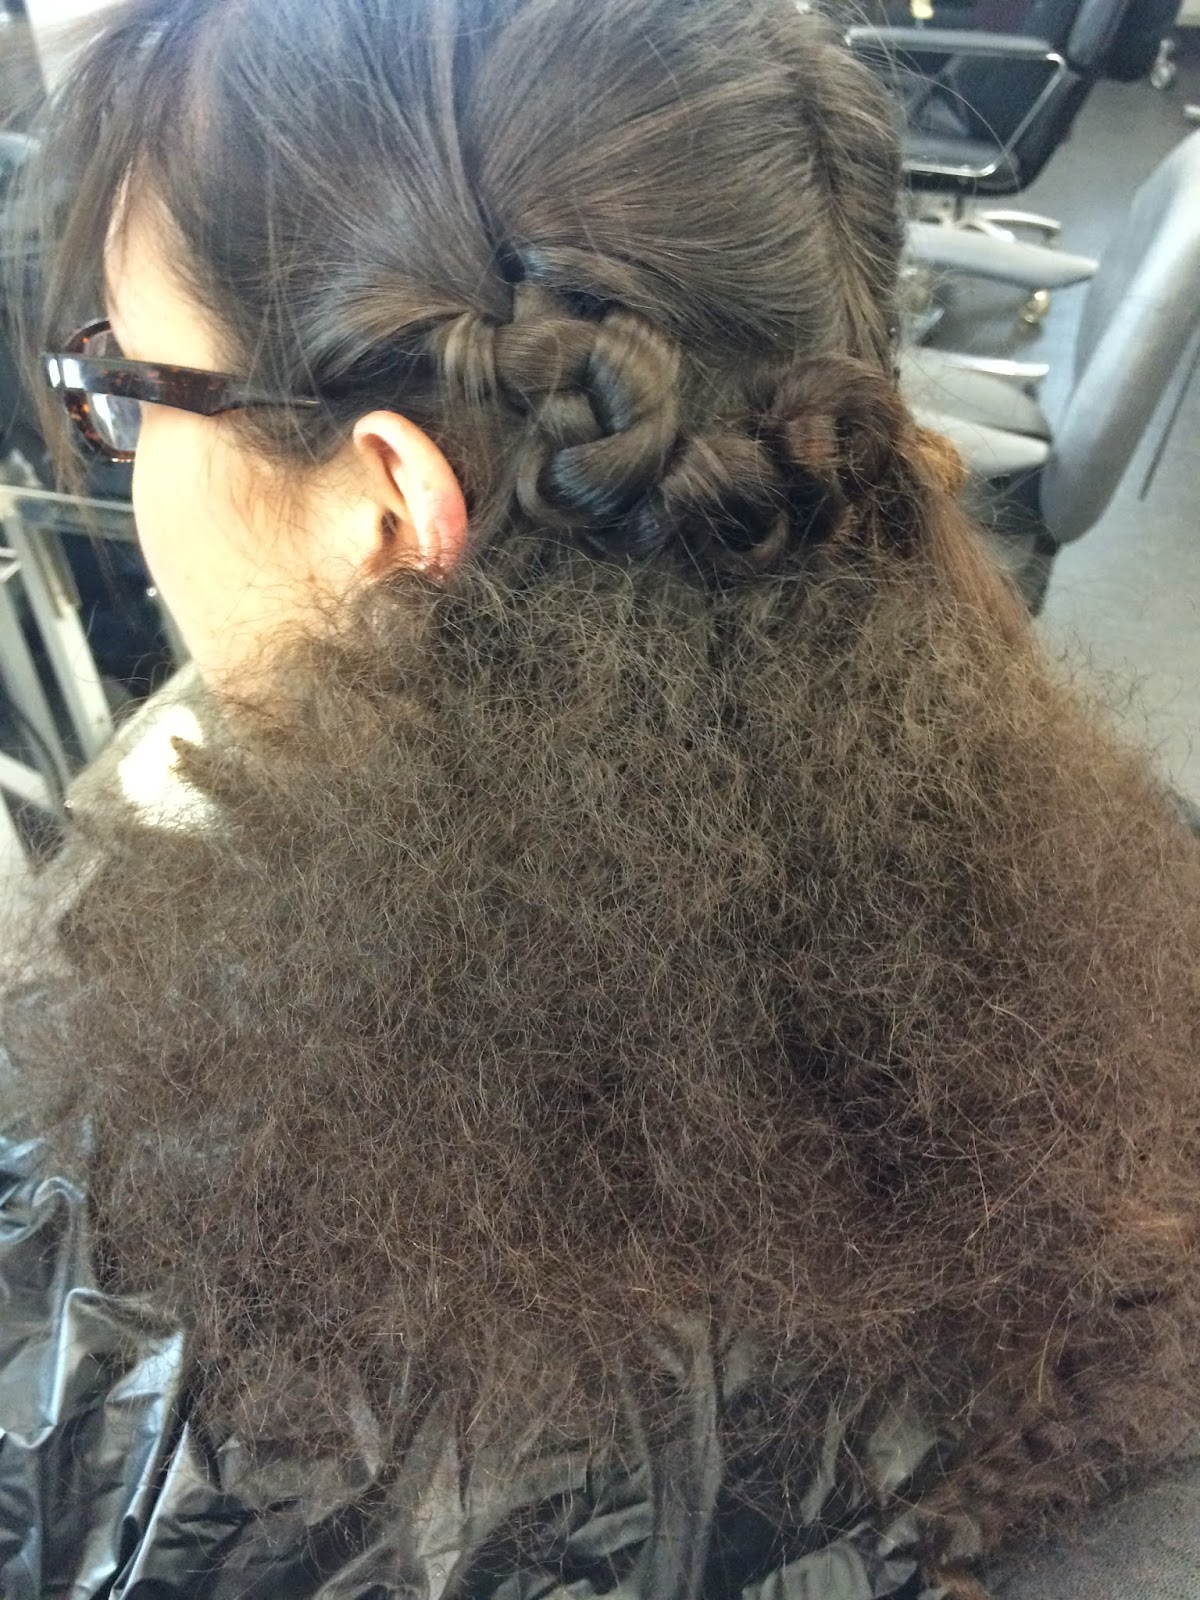
On my previous post, I was explaining how I was unsure with what to do about adding a plait around the bun in my design. I was able to get a partner to create my design on myself so that I could figure out which type of plait to use and how to incorporate it (e.g. due to my hair length).


This made even more of a heart shape than it did when I experimented on the doll's head, due to the bun being higher up and the plaits having to stretch up more.


First of all, we sectioned off half of my hair and just clipped this out of the way. We then used the frizzing technique and left these in to cool and set.

Then we created the bun (as shown on previous post) and left out a section of the hair that would have been used in the back of the bun. We actually put the bun higher up on the head than I originally planned because we thought from the front it looked almost like a small modern crown. We then tried plaiting the strand that was left out.

However, we found out that my hair was not actually long enough to reach around the bun (because we had moved it up higher on top of the head). So we split the section into 2 and gripped the plaits going opposite ways around the bun.


Finally we experimented with the intricate plait, but this did not even reach half way around the bun, therefore I have ruled out the intricate plait and will be using a normal plait.

We then released the curls/frizz.

My partner used quite large sections when doing this, which worked quite well because the hair did not shrivel up and lose lots of length, although they are not necessarily as defined as I pictured, but I think they still look quite effective. Therefore, I am, in fact, going to experiment with making much longer grips to weave the hair in and out to see how this will look. I am hoping the hair would be quite defined and show the wave/shape, but yet it would not be too tight causing it to shrink up and lose all of its length.
Wednesday, 12 November 2014
Developing My Final Design
After learning how to create the intricate plait, it made me want to incorporate something like it into my final design. I thought the plait would be an Elizabethan influence, but if I used the slightly alternative intricate plait, it would put a modern twist on it.
I experimented on my dolls head how I thought the plait could be added around the bun. The best method I found was to leave a section of hair at the back (that was original going to be used within the bun). I then created the bun, compensating for the missing section by moving some hair around - I thought this would be possible on myself because I actually have very thick hair.
I then tried plaiting this section normally and wrapping it around the base of the bun, which worked, apart from the dolls hair was not quite long enough the reach the whole way round. However, I believe my hair is slightly longer so this may be possible on m own hair.


 Looking at the design from the back actually made me think that the plaits formed almost a heart shape, which I thought could relate to the Elizabethan era because they favoured heart shapes used within the hair.
I then repeated this technique of having 2 strands of hair and experimented using the intricate plaits. Again, this just about reached for the doll's head, so I am uncertain as to how it will work on my own hair.


I experimented on my dolls head how I thought the plait could be added around the bun. The best method I found was to leave a section of hair at the back (that was original going to be used within the bun). I then created the bun, compensating for the missing section by moving some hair around - I thought this would be possible on myself because I actually have very thick hair.
I then tried plaiting this section normally and wrapping it around the base of the bun, which worked, apart from the dolls hair was not quite long enough the reach the whole way round. However, I believe my hair is slightly longer so this may be possible on m own hair.


I then used the same idea, but this time using the intricate plait. The problem I found on the doll's hair was that creating this plait makes you lose a lot of length of the hair, so it reached about half way round the bun, but I thought the design worked well and looked very unique.

However, realising how much length would be lost made me question whether this would work on my own hair, so I tried something slightly different.. I sectioned the piece of hair, left out of the bun, into 2 pieces and plaited each and wrapped it around the bun from either side to then meet in the middle. This worked on the doll quite effectively when using a standard plait.


I then repeated this technique of having 2 strands of hair and experimented using the intricate plaits. Again, this just about reached for the doll's head, so I am uncertain as to how it will work on my own hair.


To help me finalise my decisions, I am going to ask a partner to create my design on myself (like I did for them), and ask them to try the different plaits, and different ways of doing them so that I can assess what works effectively in terms of time, difficulty and the overall look.
Practising Someone Else's New Elizabethan Design

- First of all, I sectioned the hair from the top of the ears.

- I then crimped the right-hand side of the hair using Babyliss Pro crimpers (which gave a slightly bigger crimp)

- I used the frizzing technique on the left-hand side


- I then brushed out both the crimping and frizzing using a paddle brush
- I added a plait on each side, using the top section of the hair (leaving out the fringe) and gripped this into place


- I then had to straighten the fringe and the left over hair from the plait (because this was the modern influence in the design)


- Finally, we brushed out the crimping and frizzing even more and pushed the frizzing up to add even more volume and more of an Elizabethan feel
After evaluating the style, the model decided she preferred the frizzing technique because it gives the look she was trying to achieve.
The only problem we came across and had to overcome is how the plaits will be secured and gripped into place. We also realised, that it is a better idea to straighten the top section of the hair before plaiting it because it allows you to get to all of the hair, instead of it becoming merged in with the frizzed hair.
Furthermore, the model wants the design to have a fairly modern block fringe in her look, but her fringe actually needs a trim to be able to do this, so she is now aware that this needs to be done in order the make the look as successful as possible.


Overall, I was very satisfied with the style I created. I feel we worked well as a team and communicated effectively in order for me to create the look she desired. I also helped problem solve and help Nicola finalise her decisions.
Subscribe to:
Comments (Atom)